Help! The Pipe Under the Sink Is Leaking: A Homeowner’s Guide
Discovering that the pipe under the sink is leaking can be a homeowner’s nightmare. That constant drip, drip, drip not only wastes water but can also lead to significant water damage and costly repairs if left unattended. This comprehensive guide will walk you through the steps to identify the source of the leak, provide temporary fixes, and help you decide whether to tackle the repair yourself or call a professional plumber. Understanding the common causes of a pipe under the sink is leaking, coupled with quick action, can save you time, money, and a lot of stress. We’ll cover everything from identifying the type of pipe and fittings to using the right tools and techniques for a successful repair. Knowing how to handle a pipe under the sink is leaking is a crucial skill for any homeowner.
Identifying the Source of the Leak
Before you can fix a pipe under the sink is leaking, you need to pinpoint exactly where the water is escaping. The area under your sink is a complex network of pipes, fittings, and connections. Here’s a systematic approach to finding the leak:
- Dry Everything Off: Start by thoroughly drying all the pipes, fittings, and the surrounding area with a clean cloth or paper towels. This will make it easier to see exactly where the water is coming from.
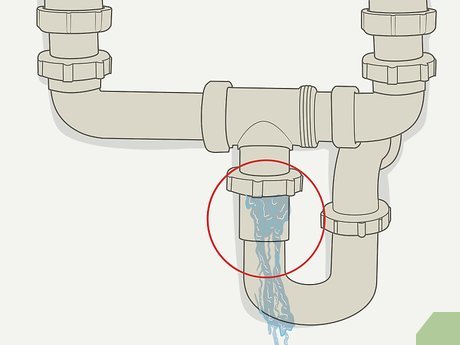
- Trace the Water: Watch carefully to see where the first signs of water appear. Is it coming from a connection point, a crack in the pipe, or a corroded area?
- Check the Obvious: Often, the leak is at a connection. Check the tightness of the nuts on the P-trap, drain tailpiece, and where the supply lines connect to the faucet.
- Look for Corrosion: Older pipes can corrode over time, leading to pinhole leaks. Examine the pipes closely for any signs of rust, discoloration, or pitting.
- Inspect the Faucet: Sometimes, water can travel down the outside of the faucet and appear to be coming from the pipes. Make sure the faucet itself isn’t leaking.
Once you’ve identified the source, take a picture. This can be helpful when you go to the hardware store to get the necessary parts or when you consult with a plumber.
Common Causes of a Leaking Pipe Under the Sink
Understanding the common culprits behind a pipe under the sink is leaking can help you prevent future problems. Here are some of the most frequent causes:
- Loose Connections: This is perhaps the most common reason. Vibrations, temperature changes, and normal wear and tear can cause the nuts connecting the pipes to loosen over time.
- Corrosion: As mentioned earlier, corrosion is a significant issue with older metal pipes. It weakens the pipe walls, leading to leaks.
- Damaged Washers and O-rings: These small rubber or plastic components create a watertight seal at connection points. Over time, they can dry out, crack, or become brittle, causing leaks.
- Clogs: A clogged drain can cause pressure to build up in the pipes, especially in the P-trap. This pressure can force water out at weak points.
- Physical Damage: Accidental impacts from objects stored under the sink can crack or break pipes.
- High Water Pressure: Excessive water pressure can strain the plumbing system, leading to leaks at various points, including under the sink.
Temporary Fixes for a Leaking Pipe
While a permanent repair is always the best solution, sometimes you need a temporary fix to stop the leak until you can get the necessary parts or call a plumber. Here are a few options:
- Tighten Connections: If the leak is at a connection, try gently tightening the nut with a wrench. Be careful not to overtighten, as this can damage the fitting.
- Plumber’s Tape (Teflon Tape): Wrap plumber’s tape around the threads of a leaky connection. This can help create a tighter seal.
- Pipe Repair Tape: This specialized tape is designed to seal leaks in pipes. Wrap it tightly around the affected area, following the manufacturer’s instructions.
- Epoxy Putty: For small cracks or pinhole leaks, epoxy putty can provide a temporary seal. Mix the putty according to the instructions and apply it to the leak.
- Bucket and Towel: In a pinch, a bucket and towel can contain the leak and prevent water damage until you can address the problem more effectively.
Important Safety Tip: Always turn off the water supply to the sink before attempting any repairs, even temporary ones. This will prevent further water damage and potential electrocution if electrical components are nearby.
DIY Repair vs. Calling a Plumber
Deciding whether to tackle the repair yourself or call a plumber depends on your skills, comfort level, and the complexity of the problem. Here’s a guide to help you make the right decision:
When to DIY:
- Simple Leaks at Connections: If the leak is clearly at a loose connection and you’re comfortable tightening nuts and replacing washers, you can likely handle the repair yourself.
- Replacing a P-Trap: Replacing a P-trap is a relatively straightforward task that most homeowners can manage with basic tools.
- Minor Corrosion: If the corrosion is minimal and you can easily access the affected area, you might be able to patch it with epoxy putty or pipe repair tape.
When to Call a Plumber:
- Extensive Corrosion: If the pipes are heavily corroded or the leak is coming from multiple areas, it’s best to call a plumber. They can assess the overall condition of your plumbing and recommend the best course of action.
- Leaks Inside the Wall: If the leak is inside the wall or you suspect that the water damage has spread beyond the immediate area, a plumber is essential to prevent further damage.
- Unsure of the Source: If you can’t pinpoint the source of the leak or you’re uncomfortable working with plumbing, it’s always best to err on the side of caution and call a professional.
- Complex Plumbing Systems: If you have a complex plumbing system or are dealing with specialized pipes (like galvanized steel or copper), it’s best to leave the repair to a plumber.
Step-by-Step Guide to Repairing a Leaky Pipe Connection
If you’ve decided to tackle the repair yourself, here’s a step-by-step guide to fixing a leaky pipe connection. Remember to always turn off the water supply before starting.
Tools and Materials You’ll Need:
- Adjustable wrench
- Basin wrench (for hard-to-reach nuts)
- Plumber’s tape (Teflon tape)
- Replacement washers or O-rings (if needed)
- Bucket and towels
- Safety glasses
Steps:
- Turn Off the Water Supply: Locate the shut-off valves under the sink and turn them clockwise until they are completely closed.
- Place a Bucket Under the Leak: This will catch any remaining water in the pipes.
- Loosen the Nut: Use the adjustable wrench to carefully loosen the nut connecting the leaky pipe. Be prepared for some water to spill out.
- Inspect the Washer or O-ring: Remove the nut and inspect the washer or O-ring. If it’s damaged, replace it with a new one of the same size and type.
- Apply Plumber’s Tape: Wrap plumber’s tape around the threads of the pipe in a clockwise direction. Overlap the tape slightly as you go.
- Reassemble the Connection: Carefully reassemble the connection, making sure the washer or O-ring is properly seated.
- Tighten the Nut: Use the adjustable wrench to tighten the nut. Be careful not to overtighten. It should be snug but not excessively tight.
- Turn On the Water Supply: Slowly turn the water supply back on and check for leaks. If you still see a leak, tighten the nut slightly more or repeat the process with fresh plumber’s tape and a new washer.
Preventing Future Leaks
Prevention is always better than cure. Here are some tips to help prevent future leaks under your sink:
- Regular Inspections: Periodically check the pipes and connections under your sink for any signs of leaks or corrosion.
- Tighten Loose Connections: If you notice any loose connections, tighten them promptly.
- Replace Old Washers and O-rings: Replace old or worn-out washers and O-rings before they cause leaks.
- Avoid Harsh Chemicals: Avoid pouring harsh chemicals down the drain, as they can corrode pipes.
- Proper Drain Maintenance: Keep your drain clear of clogs by using a drain strainer and flushing the drain regularly with hot water.
- Monitor Water Pressure: If you suspect that your water pressure is too high, have it checked by a plumber.
Conclusion
A pipe under the sink is leaking is a common problem that can be addressed with the right knowledge and tools. By identifying the source of the leak, applying temporary fixes, and either tackling the repair yourself or calling a plumber, you can prevent further water damage and save money. Remember to always prioritize safety and turn off the water supply before attempting any repairs. Regular maintenance and preventative measures can help you avoid future leaks and keep your plumbing system in good working order. Addressing a pipe under the sink is leaking promptly will save you headaches in the long run.
[See also: How to Replace a Kitchen Faucet]
[See also: Common Plumbing Problems and Solutions]
[See also: Preventing Water Damage in Your Home]
