How to Change the Selected Page to Have a Landscape Layout: A Comprehensive Guide
In the world of document creation and presentation, flexibility is key. Sometimes, a standard portrait layout simply won’t cut it. Whether you’re working on a detailed spreadsheet, a wide infographic, or a visually rich presentation slide, the need to change the selected page to have a landscape layout becomes essential. This guide provides a comprehensive, step-by-step approach to achieving this in various popular software applications.
This article delves into the practical methods of altering page orientation, ensuring your documents look professional and are optimally formatted for the content they contain. We’ll cover common programs like Microsoft Word, Google Docs, and Adobe InDesign, providing clear instructions and helpful tips along the way. Understanding how to change the selected page to have a landscape layout empowers you to control the visual presentation of your work and enhance its impact.
Understanding Page Orientation
Before diving into the how-to, let’s briefly define page orientation. Portrait orientation is the standard vertical layout, taller than it is wide. Landscape orientation, conversely, is wider than it is tall. The choice between the two depends on the content you’re presenting. Landscape is often preferred for images, charts, and tables that benefit from horizontal space.
The ability to change the selected page to have a landscape layout allows you to mix orientations within a single document. This is particularly useful for reports, presentations, and other documents that contain both text-heavy sections and visually intensive elements. The key is to understand how to apply the orientation change to specific sections or pages, rather than the entire document.
Changing Page Layout in Microsoft Word
Microsoft Word is a ubiquitous word processing program, and knowing how to manipulate page orientation is crucial. Here’s how to change the selected page to have a landscape layout in Word:
Using Section Breaks
- Insert Section Breaks: Place the cursor at the end of the page *before* you want to switch to landscape. Go to the ‘Layout’ tab (or ‘Page Layout’ in older versions) and click ‘Breaks.’ Choose ‘Next Page’ under ‘Section Breaks.’ Do the same at the end of the landscape page to revert back to portrait (if needed).
- Change Orientation: Click anywhere within the section you want in landscape. Go to the ‘Layout’ tab, click ‘Orientation,’ and select ‘Landscape.’
- Adjust Margins (Optional): After changing the orientation, you might need to adjust the margins to optimize the layout. Click ‘Margins’ under the ‘Layout’ tab and choose a preset or customize them.
This method allows you to seamlessly change the selected page to have a landscape layout without affecting the rest of the document. Section breaks are essential for controlling formatting on a per-section basis.
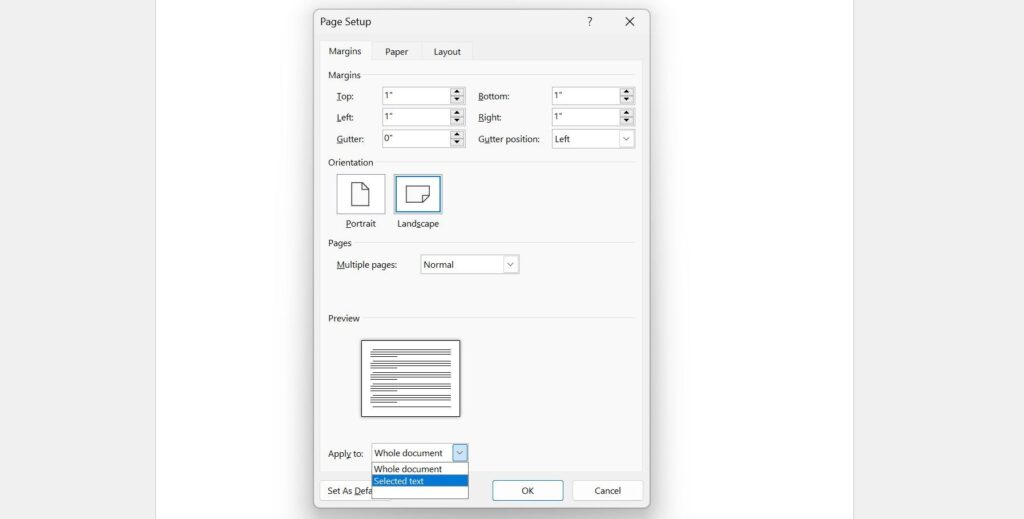
Using the Page Setup Dialog Box
- Access Page Setup: Double-click on the ruler at the top or side of the page, or go to ‘Layout’ tab and click the small arrow in the bottom right corner of the ‘Page Setup’ group.
- Select Orientation: In the ‘Page Setup’ dialog box, choose ‘Landscape’ under ‘Orientation.’
- Apply to Selected Section: In the ‘Apply to’ dropdown, select ‘This section.’ This ensures that only the current section changes orientation.
- Confirm: Click ‘OK.’
This is another effective way to change the selected page to have a landscape layout in Microsoft Word. The ‘Apply to’ option is crucial for targeting the orientation change to the desired section.
Changing Page Layout in Google Docs
Google Docs, being a web-based word processor, offers a slightly different approach, but it’s still straightforward to change the selected page to have a landscape layout:
Using Section Breaks (Similar to Word)
- Insert Section Breaks: Place your cursor where you want the landscape page to begin. Go to ‘Insert’ > ‘Break’ > ‘Section break (next page)’. Repeat at the end of the landscape section to return to portrait.
- Change Orientation: Navigate to ‘File’ > ‘Page Setup’.
- Select Orientation and Apply: Choose ‘Landscape’ orientation. Under the ‘Apply to’ dropdown, select ‘This section’. Click ‘OK’.
The process is very similar to Microsoft Word, emphasizing the importance of section breaks when you want to change the selected page to have a landscape layout. Google Docs has improved significantly in recent years, making this a reliable method.
Important Considerations for Google Docs
- Browser Compatibility: Ensure your browser is up to date for optimal functionality.
- Cloud Syncing: Google Docs automatically saves changes, so your orientation changes are immediately reflected.
Changing Page Layout in Adobe InDesign
Adobe InDesign, a professional page layout software, offers the most control and flexibility when you need to change the selected page to have a landscape layout. Here’s how:
Using the Pages Panel
- Select the Page: In the ‘Pages’ panel (Window > Pages), select the page you want to change.
- Page Attributes: Right-click on the selected page in the ‘Pages’ panel and choose ‘Page Attributes’ > ‘Rotate Spread View’. Rotate by 90° CW or CCW depending on your needs. This only rotates the view, not the actual page orientation.
- Adjust Page Size: To actually change the orientation, select the ‘Page Tool’ (Shift+P).
- Change Width and Height: In the Control panel at the top, swap the width and height values of the page. For example, if your page is 8.5 inches wide and 11 inches tall, change it to 11 inches wide and 8.5 inches tall.
InDesign provides granular control, allowing you to change the selected page to have a landscape layout with precision. The ‘Pages’ panel is your central hub for managing page orientation and other attributes.
Using Master Pages
For more complex documents, using master pages is recommended:
- Create a New Master Page: Create a new master page with the desired landscape orientation.
- Apply the Master Page: Apply the landscape master page to the specific page where you need the landscape layout.
This method ensures consistency and simplifies the process of applying landscape layouts to multiple pages. The ability to change the selected page to have a landscape layout is significantly enhanced through the use of master pages.
Troubleshooting Common Issues
Even with clear instructions, you might encounter some challenges when trying to change the selected page to have a landscape layout. Here are some common issues and their solutions:
- Orientation Changes Affecting the Entire Document: Ensure you’re using section breaks correctly. Without section breaks, the orientation change will apply to the entire document.
- Formatting Issues After Changing Orientation: Adjust margins, font sizes, and other formatting elements to optimize the layout for the new orientation.
- Incorrect Page Numbers: If page numbers are disrupted, update the page number fields or re-insert them.
Conclusion
Mastering the ability to change the selected page to have a landscape layout is a valuable skill for anyone working with documents and presentations. By understanding the methods outlined above for Microsoft Word, Google Docs, and Adobe InDesign, you can create visually appealing and professionally formatted documents that effectively communicate your message. Remember to use section breaks strategically and adjust formatting as needed to achieve the desired result. With a little practice, you’ll be able to seamlessly integrate landscape and portrait pages within a single document, enhancing its overall impact and readability. The ability to change the selected page to have a landscape layout provides the control necessary for effective document design. So, go forth and format your documents with confidence!
[See also: How to Insert Section Breaks in Word]
[See also: Google Docs Page Setup Options Explained]
[See also: Advanced Page Layout Techniques in InDesign]
