How to Make One Page Landscape in Word 2010: A Comprehensive Guide
Microsoft Word 2010 remains a staple in many offices and homes for its robust word processing capabilities. A common formatting challenge arises when you need to switch the orientation of a single page within a document, specifically, how to make one page landscape in Word 2010. This guide provides a detailed, step-by-step explanation to achieve this, ensuring your document looks professional and meets your specific formatting needs.
Whether you’re inserting a large table, a wide image, or a chart that requires more horizontal space, knowing how to adjust the page orientation is crucial. This article will walk you through the process, making it simple even for those with limited experience in Word 2010. We’ll cover everything from inserting section breaks to adjusting the page setup, so you can confidently format your documents.
Understanding Section Breaks
The key to changing the orientation of a single page in Word 2010 is understanding and using section breaks. Section breaks allow you to divide your document into different sections, each of which can have its own formatting. This means you can have portrait and landscape pages within the same document without affecting the overall layout. Here’s a breakdown of the different types of section breaks:
- Next Page: Starts the new section on the next page.
- Continuous: Starts the new section on the same page.
- Even Page: Starts the new section on the next even-numbered page.
- Odd Page: Starts the new section on the next odd-numbered page.
For our purpose of making one page landscape, we will primarily use the ‘Next Page’ and ‘Continuous’ section breaks.
Step-by-Step Guide: Changing One Page to Landscape
Here’s a detailed walkthrough of how to make one page landscape in Word 2010:
Step 1: Identify the Page
First, identify the page you want to change to landscape orientation. Position your cursor at the beginning of this page.
Step 2: Insert a Section Break (Next Page)
Go to the ‘Page Layout’ tab on the ribbon. In the ‘Page Setup’ group, click on ‘Breaks’ and select ‘Next Page’ under the ‘Section Breaks’ category. This will insert a section break at the beginning of the page you want to format as landscape.
Step 3: Insert Another Section Break (Next Page)
Now, go to the end of the page you want to be in landscape. Place your cursor at the end of the content on this page. Again, go to the ‘Page Layout’ tab, click on ‘Breaks’, and select ‘Next Page’. This will insert another section break after the landscape page, ensuring that the subsequent pages revert to the default portrait orientation.
Step 4: Change the Page Orientation
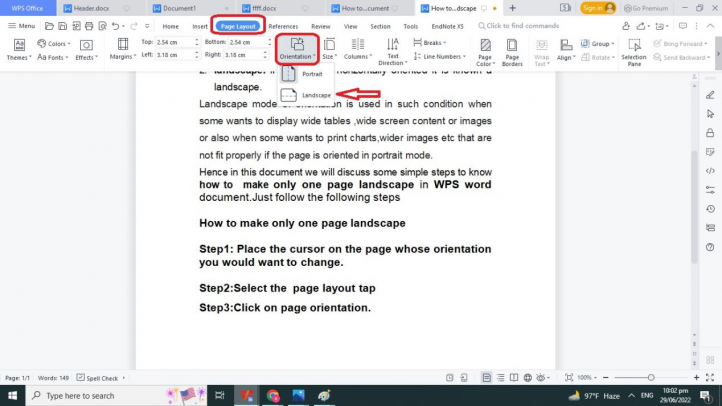
Click anywhere within the page you want to change to landscape. Go to the ‘Page Layout’ tab, and in the ‘Page Setup’ group, click on ‘Orientation’. Select ‘Landscape’. Only the page between the two section breaks will change to landscape orientation.
Step 5: Verify the Formatting
Scroll through your document to ensure that only the intended page is in landscape and that the surrounding pages remain in portrait orientation. If there are any discrepancies, you might need to adjust the placement of your section breaks.
Alternative Method: Using Continuous Section Breaks
Another approach to how to make one page landscape in Word 2010 involves using continuous section breaks. This method is useful when you want to keep the content flowing without starting a new page.
Step 1: Identify the Section
Identify the section of the page you want to be in landscape. This could be a paragraph, a table, or an image.
Step 2: Insert Continuous Section Breaks
Place your cursor at the beginning of the section you want to be landscape. Go to the ‘Page Layout’ tab, click on ‘Breaks’, and select ‘Continuous’ under the ‘Section Breaks’ category. Then, place your cursor at the end of the section and insert another ‘Continuous’ section break.
Step 3: Change the Page Orientation
Click anywhere within the section between the two continuous section breaks. Go to the ‘Page Layout’ tab, and in the ‘Page Setup’ group, click on ‘Orientation’. Select ‘Landscape’. Only the specified section will change to landscape orientation.
Step 4: Adjust Margins (If Necessary)
Sometimes, when using continuous section breaks, the margins might need adjustment to ensure the content fits properly on the landscape section. Go to the ‘Page Layout’ tab, click on ‘Margins’, and select ‘Custom Margins’. Adjust the top, bottom, left, and right margins as needed.
Troubleshooting Common Issues
While following the steps above, you might encounter a few common issues. Here’s how to troubleshoot them:
Issue: Incorrect Page Orientation
If more than one page changes to landscape, it’s likely that your section breaks are not correctly placed. Double-check the placement of your section breaks and ensure they are exactly where you want the orientation to change.
Issue: Content Overflow
When switching to landscape, the content might overflow or not fit properly on the page. Adjust the margins, font size, or spacing to ensure the content fits within the landscape page. You can also adjust the column widths if you are working with tables.
Issue: Section Breaks Not Visible
To see the section breaks in your document, go to the ‘Home’ tab and click on the ‘Show/Hide ¶’ button in the ‘Paragraph’ group. This will display all formatting marks, including section breaks, allowing you to easily identify and adjust them.
Advanced Tips for Formatting in Word 2010
Beyond simply changing the orientation, here are some advanced tips to enhance your formatting skills in Word 2010:
- Use Styles: Use styles to maintain consistent formatting throughout your document. Styles allow you to quickly apply the same formatting to multiple sections.
- Create a Template: If you frequently need to change page orientations, create a template with pre-set section breaks and formatting.
- Page Numbers: Ensure your page numbers are correctly formatted after inserting section breaks. You might need to restart page numbering for each section.
Why is This Important?
Knowing how to make one page landscape in Word 2010 is crucial for creating professional-looking documents. It allows you to seamlessly integrate content that requires a different orientation without disrupting the flow of the document. This is particularly useful when including large tables, charts, or images that benefit from a wider format.
Moreover, mastering this technique enhances your overall proficiency in Microsoft Word, making you more efficient and effective in creating various types of documents. Whether you’re working on a report, a presentation, or a resume, the ability to control page orientation adds a level of polish and professionalism to your work.
In conclusion, the process of how to make one page landscape in Word 2010 is straightforward once you understand the importance and application of section breaks. By following the steps outlined in this guide, you can confidently format your documents to meet your specific needs and present your content in the most effective way possible. Remember to practice and experiment with different techniques to further refine your skills and become a proficient Word user. [See also: How to Insert Section Breaks in Word] and [See also: Word 2010 Page Layout Options]
